|
| Kitkat 4.4 Galaxy Nexus |
Unfortunately, those of you with a Galaxy Nexus can kiss your KitKat flavored dreams goodbye. Google has confirmed that the less than two-year-old phone won't be getting Android 4.4. Google doesn't have minimum hardware requirements for Android 4.4. Even so, the company made a big deal about the fact that KitKat can run comfortably on 512 MB of RAM and the Galaxy Nexus has twice that. Of course, you could always get around this sad fact by rooting your device and running a custom Android 4.4 ROM. If you don't want to do that and desperately want KitKat, there isn't much you can do beyond buying a new phone. Cyanogenmod Team has started their focus on developing Kitkat to run on Galaxy Nexus perfectly. Currently the ROM is still in beta stage but surely, it won't take long to get the stable full functioning ROM. CM ROM is always reliable. That's why it is recommended in this post to install CM 11 ROM to taste the Kitkat.
A close look at KitKat's new home screen, Google Now is always your left-most home screen. The dialer gets a new look. Google voice control is easily accessed by saying 'OK, Google'.
A Whole New Look
The moment you first see the new home screen in KitKat, the improvements are apparent. The fonts appear smaller and more slender, while several newly redesigned app icons have grown a bit in size. The biggest visual change for most users, while still subtle, is likely to be the addition of a more fully transparent background to the top status bar, the on-screen buttons on the bottom of the home screen, and the app drawer.
The result is a user experience that seems a little more unified and grounded in the home screens and is somehow warmer. It's kind of nice not to be launching apps from the black void of a background-less app drawer.
 |
| The new look of home screens and the app drawer on KitKat |
Another change that might make sense from a holistic design perspective but needlessly removes some handy bits of functionality is the move to "de-blue" a number of icons throughout KitKat. For example, in the status bar, the Wi-Fi and cell network activity icons no longer turn blue to indicate the presence of data connectivity. Instead, they're always gray when present and there's no longer a means of checking your network data status at a glance. Previous actions like keyboard presses that may have previously resulted in blue highlights have also gone gray in KitKat.
 |
| The new lock screen displays album art of currently playing media |
There's also no immediately obvious way to add home screens. It has to be done by selecting and dragging an app, either from an existing home screen or the app drawer, to the right edge of the screen, which then either scrolls to the next screen to the right, or creates a new one. But what if you want to add a new home screen all the way to the left, you ask? No dice, and here's why:
Google Now Has A New Home
 |
| Google Now is always your left-most home screen |
KitKat has baked Google Now, search and voice control deeper into Android than ever before. Once you're past your lock screen you can say "OK, Google" at any point to trigger Google Now's voice control and start barking out commands and searches. As mentioned earlier, you can also adjust settings for Google Now, search and voice control by simply long-pressing on any home screen empty space.
While the left-most Google Now home screen can't be removed, KitKat does allow for management of any home screen replacements that you might install. You switch between them in the "Home" section of Settings.
Revamped Apps
A number of native Android apps get new treatments in KitKat, starting with Hangouts, which has swallowed text messaging in the process. This is probably my least favorite "improvement" in Android 4.4 – combining SMS and Google Hangouts (which itself had already swallowed Google Talk and Chat in earlier versions) isn't intuitive at first and it can be confusing to know which method of communication you're actually using to contact someone.
 |
| Hangouts and SMS are now the same app |
The next big change is seen in the phone app, which attempts to shift the focus away from the dialpad, encouraging you instead to search for contacts and businesses via both the web and locally on your device. The dialpad is still there, but it's just not the first thing you see, and when you click on its icon, it overlays itself over the search window instead of taking the full screen.
When you receive a call that isn't in your local contacts, Google now introduces its own form of caller ID by cross-checking the incoming call number with Google Places. So if the call is coming from an existing business, it's likely that you'll be able to see which one is calling you in KitKat, which is a nice little bonus.
 |
| Caller ID is provided by Google Places |
Finally, some new power-saving features allow KitKat to be less demanding on devices. A special low-power mode can allow for up to 60 hours of continuous audio playback, and new location modes allow you to keep track of your whereabouts when you need it and without having to manually toggle GPS and network settings to save battery when you don't.
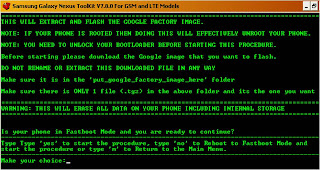
Let starts the tutorial of installing Cyanogenmod 11 on Galaxy Nexus
NOTE: Need to be on the latest version of CWM Recovery.
- Download Cyanogenmod 11.zip and Kitkat Gapps.zip & copy to phone.
- MAKE A BACKUP!!!
- DO A FACTORY RESET!!! - this will wipe data & cache!
- Go to install zip from sdcard
- Choose zip from sdcard
- Select Cyanogenmod 11.zip
- Confirm
- Repeat Steps 5 -8 for gapps
- Reboot
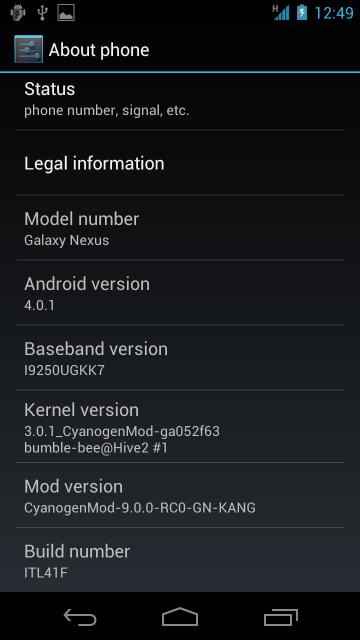
Whats Working??
- Everything it seems